How to Boost Relevant Search Results
About Tuning Stages
When you add a Tuning stage, choose one of the following operations:
- For all of the search engines that are listed on this page, click Add New Query Stage/Add New Results Stage and specify the settings below.
- For a selected search engine, click <Search Engine> > <name of your search engine such as Elasticsearch> to see the Edit SmartHub search engine page.
- Perform the same operations that you perform to add tuning stage(s) to the selected search engine.
Limitations
-
Some SmartHub features are unsupported by some search engines.
-
For information about limitations to your search engine, see the "Limitations" topic for your search engine.
About Graph Boosting Tuning Stage
The graph boosting tuning stage boosts search results that are more relevant, according to the Microsoft Graph API.
How to Set Up the Graph Boosting Stage
For either operation, use the following steps:
-
Go to the <name of your search engine such as Elasticsearch> > Tuning Stages.
-
Click Add New Query/Results Stage and the tuning page appears.
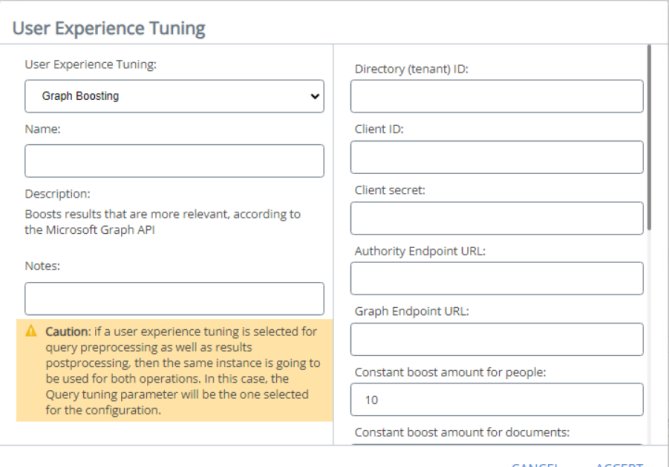
- Tenant URL (required), shown in the graphic below, refers to the Directory (tenant) ID.
- Do NOT enter your Tenant URL in this field.
- Enter the Tenant ID.

Note: The information required in the screen above, is detailed below.
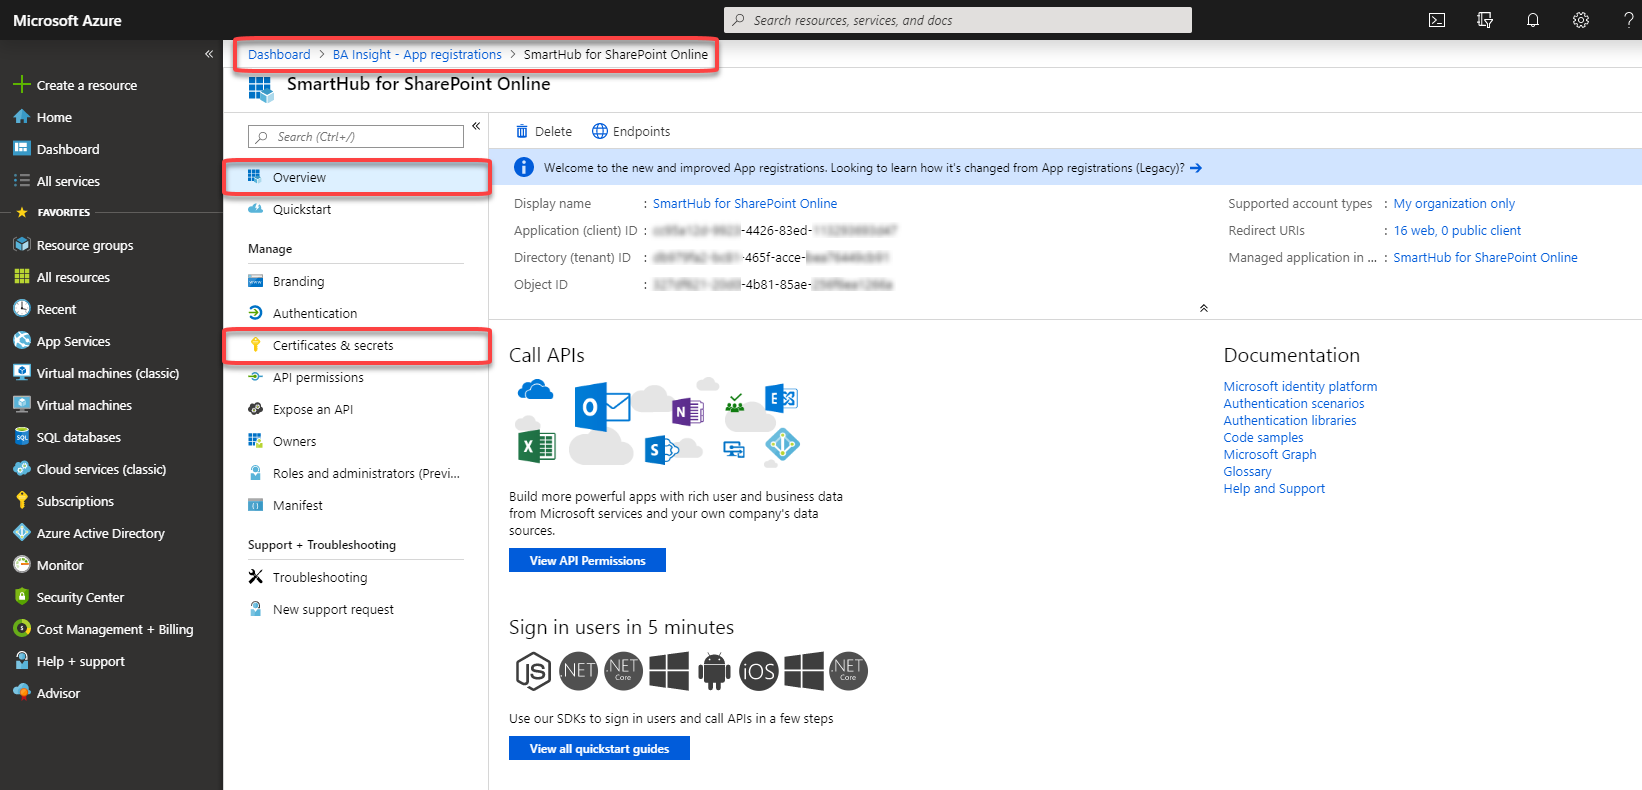
To gather this information, go to the Microsoft Azure Active Directory (portal.azure.com), and follow these steps:
- Log-in with your global admin.
- Click on Azure Active Directory option from the left-side navigation.
- Click on App Registrations.
-
Select the SmartHub App you created to secure SmartHub.
- User Experience Tuning: Select Graph Boosting Stage from the drop-down list.
- Name: Enter a name for your stage. This field is required.
- Tenant URL: This is the Directory (tenant) ID. This field is required. You can find your directory (tenant) ID on the overview page for your Microsoft Azure app.
- Client ID: This is the Application (client) ID. This field is required. You can find your application (client) ID on the overview page for your Microsoft Azure app.
- Client Secret This is the client secret key. This field is required. You can find your application (client) ID on the Certificates and Secrets page for your Microsoft Azure app.
- Constant boost amount for people: This is the value used in order to boost people. This field is optional.
- Constant boost amount for documents: This is the value used in order to boost documents. This field is optional.
- Skip boosting recent documents: Select whether to enable or disable this feature. This field is optional.
- Skip boosting trending documents: Select whether to enable or disable this feature. This field is optional.
- Skip boosting all relevant people if no relevant people matching the query text were found: Select whether to enable or disable this feature. This field is optional.
- Skip boosting relevant people whose names match the query text: Select whether to enable or disable this feature. This field is optional.
- Skip boosting relevant people with whom the discussed topics match the query text: Select whether to enable or disable this feature. This field is optional.

API Permissions Required by the Graph Boosting Stage
The following Microsoft Azure Active Directory (portal.azure.com) screen.
- Log-in with your global admin.
- Click on Azure Active Directory option from the left-side navigation.
- Click on App Registrations.
-
Select the SmartHub App you created to secure SmartHub.
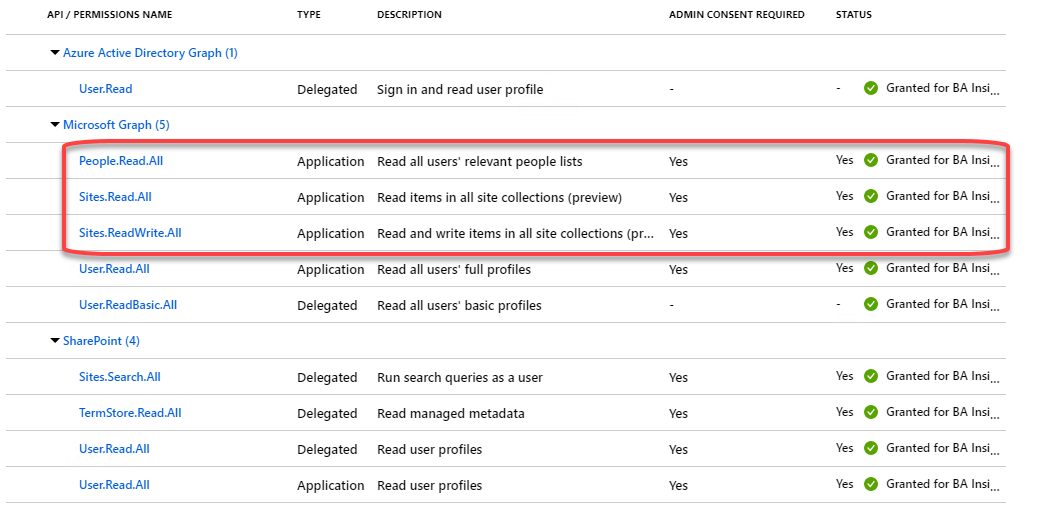
Note: Your SmartHub App must have the permissions shown in the graphic below, excluding the first 3 permissions under Microsoft Graph.
- Select API permissions.
- Click the Add permissions.
- Add only the first 3 permissions shown under the Microsoft Graph category, shown below.
